
Update (03/26/2014): We have finished the characterization and deployed the $80 50W wind turbine. The model and characterization was close. See the blog posting about the 50W Loaded Characterization and the Project Curacao Operational Blog posting)
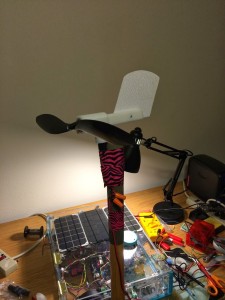
We decided a while ago to add a small wind turbine to Project Curacao. This week we finally got around to installing the wind turbine in the Project Curacao system. We are measuring the unregulated wind turbine voltage, the regulated wind turbine voltage and the Pi solar panel voltage using the Arduino Battery Watchdog A/D converters. After understanding the Arduino A/D (it has one A/D converter and then multiplexes the individual analog pin), we had to add multiple delays and reads to allow the voltages to stabilize. We also average 10 values of important channels (the battery voltage of the Pi in this system) to reduce noise.
An excellent thread reference about reading multiple A/D analog channels on the Arduino is: https://forum.arduino.cc/index.php?topic=54976.0
The description of the Analog to Digital converter on the Arduino from the specification follows:
“The analog input circuitry for single ended channels is illustrated in Figure 23-8. An analog
source applied to ADCn is subjected to the pin capacitance and input leakage of that pin, regardless
of whether that channel is selected as input for the ADC. When the channel is selected, the
source must drive the S/H capacitor through the series resistance (combined resistance in the
input path).
The ADC is optimized for analog signals with an output impedance of approximately 10 kΩ or
less. If such a source is used, the sampling time will be negligible. If a source with higher impedance
is used, the sampling time will depend on how long time the source needs to charge the
S/H capacitor, with can vary widely. The user is recommended to only use low impedance
sources with slowly varying signals, since this minimizes the required charge transfer to the S/H
capacitor.
Signal components higher than the Nyquist frequency (fADC/2) should not be present for either
kind of channels, to avoid distortion from unpredictable signal convolution. The user is advised
to remove high frequency components with a low-pass filter before applying the signals as
inputs to the ADC.”
The Wind Turbine we are using is a $119 single blade 15 Watt DIY Small Wind Turbine Kit system from https://store.sundancesolar.com/15-watt-diy-small-wind-turbine-kit/. It is not worth using it in Project Curacao. The 50W Wind Turbine below is a far better buy.
The $80 50W Wind Turbine is available here. The 15W turbines don’t produce enough current to make them worth it at 15MPH.
We aren’t specifically recommending this turbine but it was the first inexpensive one we ran into so we bought it. The first thing we needed to do was characterize the open loop voltage curve so we knew what voltages we were getting out of the turbine. We put the turbine on a garden spade (literally) and stuck it outside the car through the window and drove at fixed rates of speed and measured the voltage with a multimeter. We got strange looks from the neighbors (and a policeman) and had a hard time maintaining the speed because of the blizzard and ice on the road.<\span>
 |
| The Wind Turbine on a Spade |
 |
| Wind Turbine and Car in Snowstorm |
We gathered the data up to 50 MPH, put it in an Excel spreadsheet and did a third order polynomial curve fit to get an equation to use in the software to predict the wind speed given an open loop voltage (which we are gathering).

The equation we are using is:
Equation: y = (c3 * x^3) + (c2 * x^2) + (c1 * x^1) + b
Where:
y = Wind Turbine Output Voltage
x = Wind Speed in MPH
The coefficients are:
| c3 | -0.000224491 |
| c2 | 0.012549184 |
| c1 | 0.255523699 |
| b | 0.247342657 |
The maximum curvefit errors are +0.4V/-0.6V, +6.89%/-4.74%. Good enough for our purposes. Our data certainly isn’t any better than +/-10% given the snow and general driving.
We are using this curve for control functions inside the Arduino Watchdog and for calculating the wind speed.
We are looking for a minimum 9 volts to run into our 6V regulator (which then is fed to the battery charging circuit).
Following is the 50W Wind Turbine Open Loop Curve.

This leads us to several conclusions:
1) We need a wind speed of 20 MPH to generate power in our system. We are sure there are better low speed turbines for our system.
2) The average wind speed in Curacao is about 14 MPH. This means a substantial part of the time we won’t be generating power. How do we fix this? We move the wind turbine higher on the tower as the wind speed is generally higher the higher you are above the ground. We want the turbine as high as we can reasonably get it. We gain about 15% in wind speed going up 10 meters (https://wind-data.ch/tools/profile.php), so we will see what can do. We don’t have a good number on the spread of wind speeds in but it looks like the bulk of the wind is between 10 MPH and 25 MPH so we will get some power. Good thing we have solar cells.
3) Note how the voltage flattens out as we approach 50 MPH at about 16.5V. Our system is designed to measure up to 17V (a voltage divider down to 5V for the Arduino) and tolerate up to 18.7V (no more than 5.5V into the Arduino). This looks good. If we have more than 50 MPH winds, the analog inputs will be the least of our problems.
Our control system will take this into account on cloudy days (low luminosity and solar voltage) and turn the wind turbine on. Of course, we will turn the wind turbine on at night all the time.
Next post we will describe the regulator for connecting the wind turbine to our charging system. We are waiting for a new variable power supply to run these checks as we only get about 5 MPH out of our box fan.
Hi,
very interesting project and article. Currently I work also with a raspberry pi and a DHT22 sensor. But every time when I start a RasPi camera stream, it’s very difficult to get correct values. I found the Adafruit_DHT_MOD from your project on github and with this I get satisfying values most of the time. Can you tell me what you changed or maybe send the source code to me because I would like to adapt the output a little bit.
Greetings
Patrick
Hi,
I just posted the source code up at github in the ProjectCuracao source under the hardware directory.
I also use the following python code to get rid of bad data (Interrupts still corrupt the reads, even with the above code).
# Inside Humidity
Oldinsidehumidity = -1000.0 # bad data
insidehumidity = -1000.0 # bad data
try:
maxCount = 20
count = 0
while (count < maxCount):
output = subprocess.check_output([“/home/pi/ProjectCuracao/main/hardware/Adafruit_DHT_MOD”, “22”, “23”]);
print “count=”, count
print output
# search for humidity printout
matches = re.search(“Hum =s+([0-9.]+)”, output)
if (not matches):
count = count + 1
time.sleep(3.0)
continue
Oldinsidehumidity = float(matches.group(1))
count = maxCount
# now do it again. Throw out the higher value (get rid of high spikes)
time.sleep(1.0)
maxCount = 20
count = 0
while (count < maxCount):
output = subprocess.check_output([“/home/pi/ProjectCuracao/main/hardware/Adafruit_DHT_MOD”, “22”, “23”]);
print “count=”, count
print output
# search for humidity printout
matches = re.search(“Hum =s+([0-9.]+)”, output)
if (not matches):
count = count + 1
time.sleep(3.0)
continue
insidehumidity = float(matches.group(1))
count = maxCount
if (Oldinsidehumidity < insidehumidity):
insidehumidity = Oldinsidehumidity
except IOError as e:
print “I/O error({0}): {1}”.format(e.errno, e.strerror)
except:
print “Unexpected error:”, sys.exc_info()[0]
raise
Best regards,
John
Hi,
thank you for your fast answer and the Python code. Sorry for answering late because I thougt I would get a mail if someone answer therefore I did not recognize your reply earlier.
Great work!
Patrick