
Reliable Projects 5: External WatchDog Timers for Raspberry Pi/Arduino Systems
Summary: In Part 5 of this series we look at setting up an External WatchDog Timer with  the Arduino and also with the Raspberry Pi. We use the SwitchDoc Labs Dual WatchDog Timer, which is a good choice for an External WatchDog Timer in many, but not all, systems. Finally, we look at a real world problem of RFI (Radio Frequency Interference), which really hits the Project Curacao Box.
Part 2 – Using the Internal WatchDog Timer for the Raspberry Pi
Part 3 – Using the Internal WatchDog Timer for the Arduino
Part 4 – Internal Versus External WatchDog Timers
A solution to all of the potential problems and issues with the Internal WatchDog Timers discussed in the previous 4 parts of this series is to use an External WatchDog Timer. As we were exploring this set of problems with Project Curacao, we decided to build my own External WatchDog timer. Designing our own timer gives us a fixed set of parameters not dependent on other sofware processes (in the Raspberry Pi case) and which Arduino we are using (in the other case). And then there were the significant power system issues as Project Curacao is Solar and Wind Powered and has brownout issues (hey, it gets cloudy in the tropics too!).
The Code for “Patting The Dog” in Python and C
To “pat the dog” or trigger the External WatchDog Timer, you need to use the following code. Since the line has to be held in high impedance mode and then just taken to ground when you pat the dog, the code for the Arduino looks like this:
#define RESET_WATCHDOG1 9

void ResetWatchdog1()
{

     pinMode(RESET_WATCHDOG1, OUTPUT);
     delay(200);
     pinMode(RESET_WATCHDOG1, INPUT);
     Serial.println("Watchdog1 Reset");
}
And in Python for the Raspberry Pi, the code looks like this:
#define RESET_WATCHDOG1 18
def resetWatchDog():

	GPIO.setup(RESET_WATCHDOG1, GPIO.OUT)
	GPIO.output( RESET_WATCHDOG1, False)
	time.sleep(0.200)
	GPIO.setup(RESET_WATCHDOG1, GPIO.IN)
You put these functions in your code such that you pat the dog more often than Wto. Wto is defined as the maximum amount of time the WatchDog Timer can count before it needs to be reset (in other words, when it will reboot the computer if the computer goes away.
You can download the entire specification for the SwitchDoc Labs Dual WatchDog Timer here: Dual WatchDog Timer

Setting Wto on the SwitchDoc External WatchDog Timer

You can adjust Wto from about 220 seconds to 30 seconds.
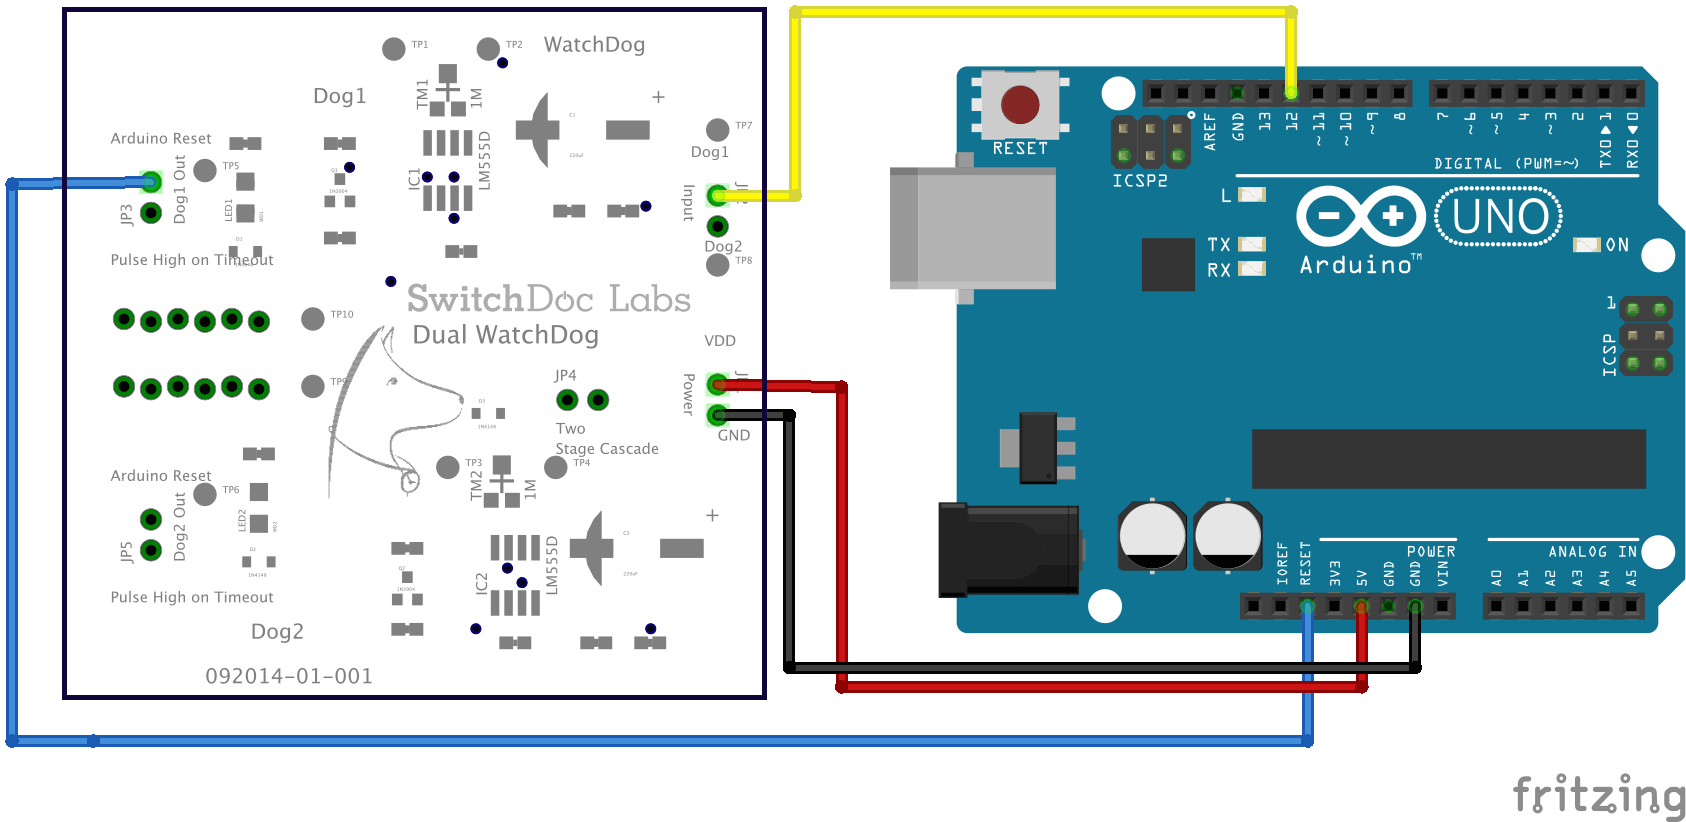
Using an External WatchDog Timer with the Arduino
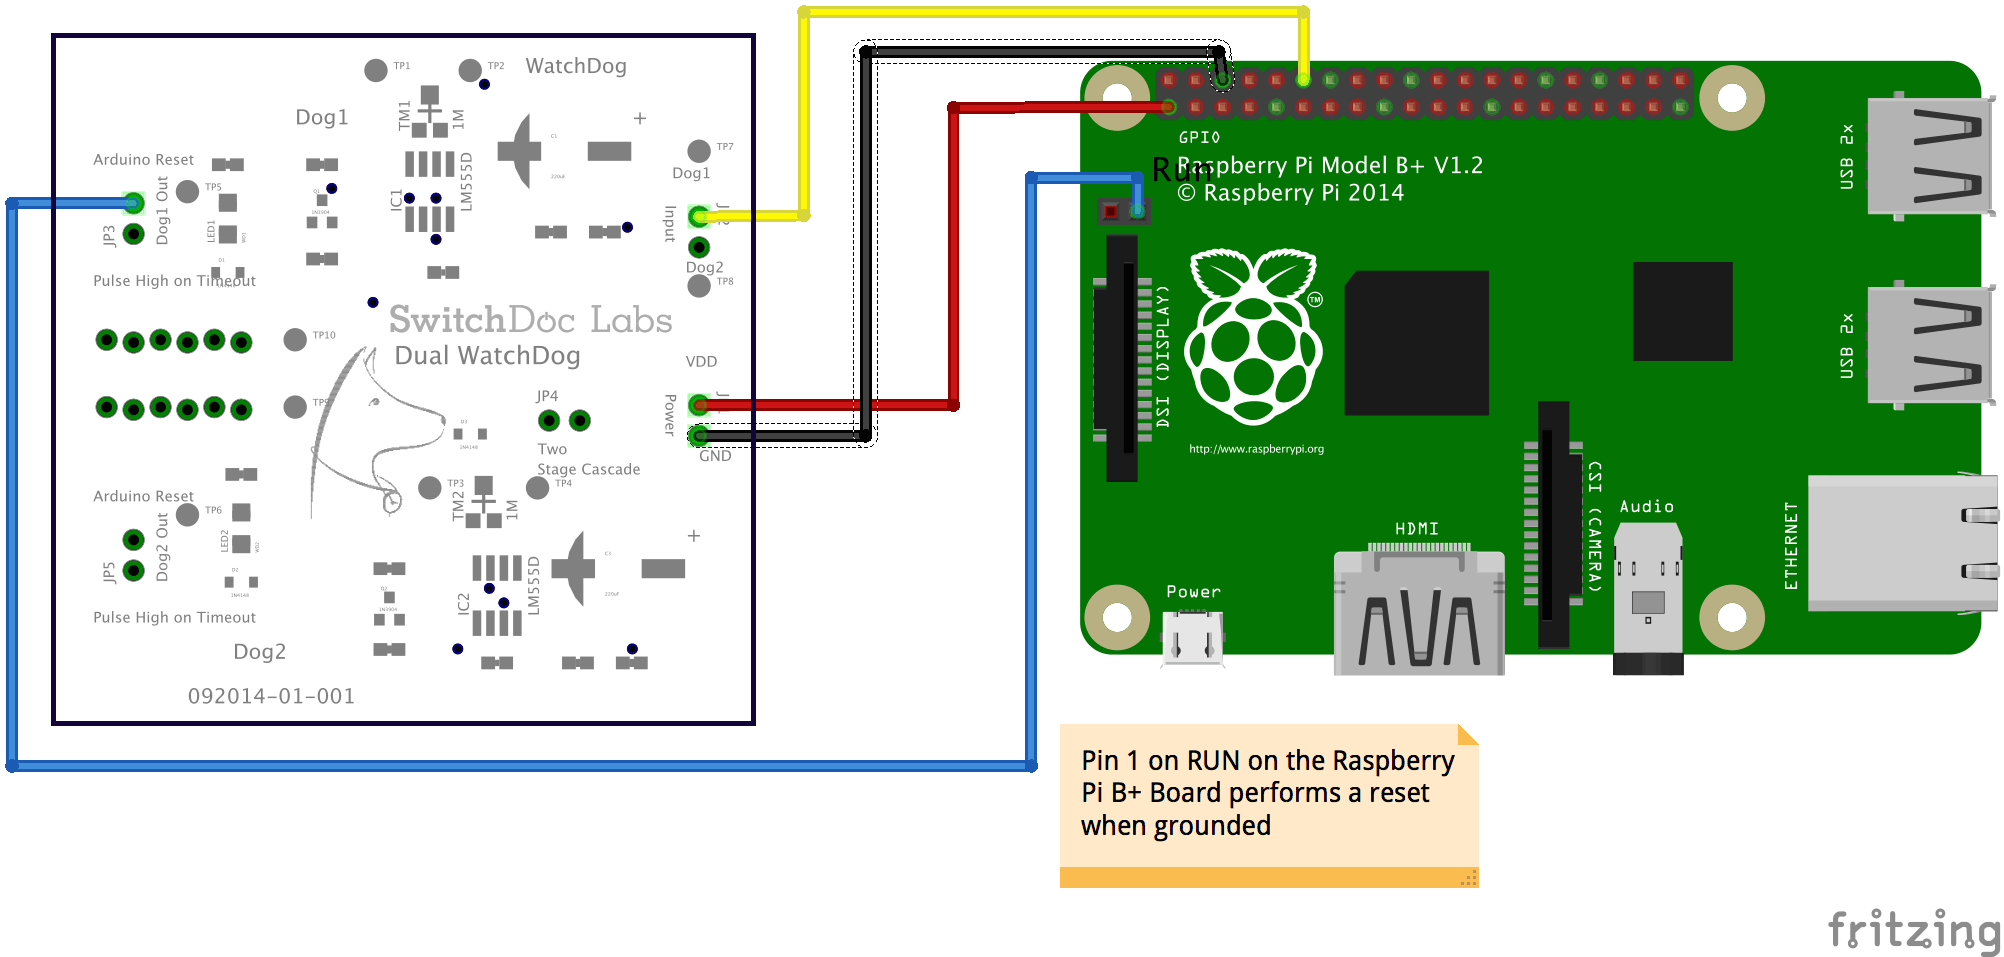
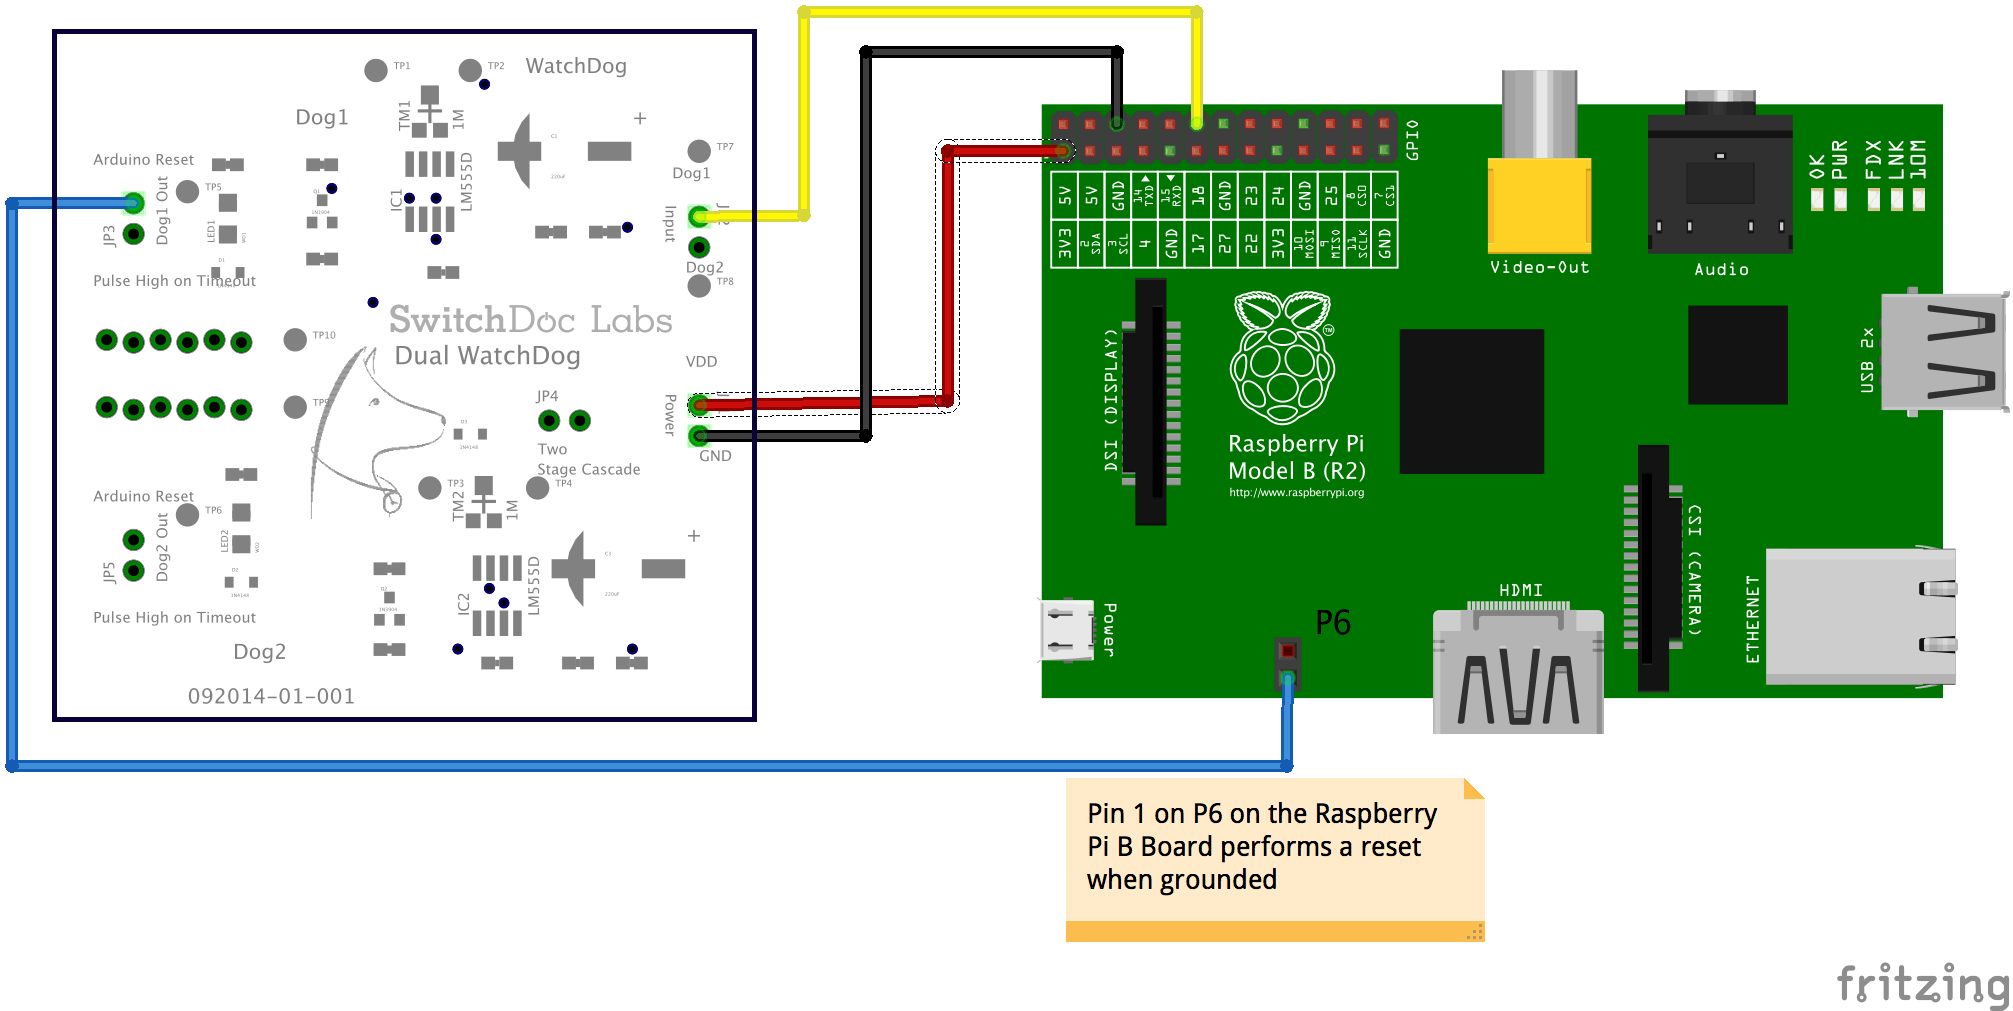
Using an External WatchDog Timer with the Raspberry Pi
Radio Frequency Interference – A Real World Problem
The significant problem we discovered with RFI (Radio Frequency Interference) was when  the Amateur Radio folks powered up their worldwide radio contest in October and November on 28MHz. Our box is connected to a radio tower in Curacao. And connected to a 15 meter line which just happens to be about 3 wavelengths of 28MHz, making a very good antenna. Things looked good up until the radio contest!
The wavelength of 28MHz radio waves is about 5 meters. We had a 15 meter line. Not a bad antenna for receiving 28MHz signals. Assuming that it is about 12 meters effective we have a nice 1/2 wavelength (2.5 wavelengths actually) staring at the input to the Arduino. And the WeatherRack (seen in the distance below)

is connected directly to the tower where the 28MHz signal is being transmitted. Could be an issue, for sure. We have a question into the Radio Gods about what kind of voltages could I expect. One God (Geoff) replied, saying up to 2V. That is pretty close to 2.5 Volts which will start triggering things.
The second God (Jeff) indicated that it could be all the way up to 3V and that there the contest last weekend was not just on 28 MHz. It was an all-band contest, on the 160, 80, 40, 20, 15, and 10 meter bands. During daylight hours on the contest weekend, transmitting will have been on

10m (28.3 – 29.0 MHz), 15m (21.2 – 21.4), and 20m (14.15 – 14.3 MHz). During nighttime hours on the contest weekend, transmitting will have been on 160m (~1.8 – 1.9 MHz), 80m (~3.6 – 3.9 MHz), 40m (~7.05 – 7.25 MHz) and 20m (~14.15 – 14.3 MHz).
Lots of little signals running around my box with the big new wire (antenna) connected.
Yet another reason to use an External WatchDog Timer because the RFI was putting the Arduino in a state that required a power reset.
Conclusion
WatchDog Timers can improve the reliability of your Arduino and Raspberry Pi projects. Internal WatchDogs have limitations in both the Arduino and Raspberry Pi but can still improve your project reliability. For those issues (such as Brownouts, power loss, coding errors and RFI) that aren’t handled well by the Internal WatchDog Timers, a better solution is to use an External WatchDog Timer.
Hi,
A 555 wouldn’t work as well ?
This is a Dual 555 based board. The 555 is rock solid for this kind of application if you pay attention to the inputs and outputs. It has some interface tricks to allow you to stage two timers together to produce a pulse (for a relay for example) and can reset both a Raspberry Pi and an Arduino. Take a look at the product brief on https://www.switchdoc.com/dual-watchdog-timer/ to see the whole theory of operation.
It also is designed to allow the power to the WatchDog timers to be shut off if the voltage is too low. The new SunAir Solar Controller board takes advantage of this feature, so the Watchdog won’t keep trying to boot the computer until the voltage is sufficient to run the computer.
John
John..i want to incorporate your watchdog timer into my RPi, but as a real noobe to python, I am not sure where to put the code. I have the pi dedicated to running Weewx, a weather station program, and I don’t want to break the program by adding code in the”wrong” place. I currently have the program doing an ftp to my website (see above) every 2 minutes. Would it be a good idea to put the code in that part of the program? If so, should I use 200 as in your code (I assume that is 200 seconds?), or use some other value?
Thanks
Steve.
You have got the right idea. You need to put the dog pat at a point in your code that is executed < 200 seconds (and I'd leave at least 20% margin for operating system issues). 200 should be fine in this case. Good luck!