
IOT ESP8266 Tutorial – Displaying the data on the IBM Bluemix IOT

This is the eighth of a multi-part posting on the ESP8266. In this posting we are showing how to display real-time data on the the IBM Bluemix Internet of Things Service using the ESP8266 source code done in the Arduino IDE.
One item of help we can offer. We have had a difficult time with the IBM Bluemix on the Safari browsers. Changing to Chrome made things work much better.
For this series, we are using a IOT device designed by SwitchDoc Labs based on the ESP8266 WiFi/processor in two variants. One device connected to a TSC3574 I2C Color Sensor and the other device a portable IoT connected heart rate pulse detector. We are using the Color Sensor for this posting.
Part 1 IOT ESP8266 Tutorial – Using nodeMCU/LUA
Part 2 IOT ESP8266 Timer Tutorial – Arduino IDE
Part 3 IOT ESP8266 Tutorial – Using the Arduino IDE
Part 4 IOT ESP8266 Tutorial – AT Command Set Firmware
Part 5 IOT ESP8266 Tutorial – Connect to the IBM Bluemix Internet of Things
Part 6 IOT ESP8266 Tutorial – Sending ESP8266 Data to the IBM Bluemix IOT
Part 7 IOT ESP8266 Tutorial – The IOT Application and Source Code
Part 8 IOT ESP8266 Tutorial – Displaying the data on the IBM Bluemix IOT
We are using the Adafruit ESP8266 Huzzah breakout board for these postings.
The ESP8266
The ESP8266 is made by a privately held company in China called Espressif. They are a fabless semiconductor company that just came out of nowhere and shook up the whole industry. Now all the major players are working on inexpensive versions of an IOT chip with WiFi connectivity. And they are all struggling to make it as inexpensive as the ESP8266

The Adafruit ESP8266 Huzzah
The Adafruit ESP8266 Huzzah board is a great breakout for the ESP8266. It makes it much easier to use than the really cheap modules.
Most of the low cost modules are not breadboard friendly, don’t have an onboard 3.3V regulator or level shifting for signals. The Huzzah has all of those features. For more on the ESP8266 Huzzah board see this posting.
The ESP8266 Software
We are using the Arduino IDE for this project. See how to use the Arduino IDE with the ESP8266 in this posting. We are also assuming that you successfully set up an account on the IBM Bluemix IoT platform as shown in the previous tutorial, Part 5. as well as setting up your Bluemix IOT device credentials in Part 6.
The IBM Bluemix Internet of Things Solution

Bluemix is an implementation of IBM’s Open Cloud Architecture that enables you to rapidly create, deploy, and manage cloud applications for the Internet of Things. There are a significant growing ecosystem of runtime frameworks and services. Blue mix provides a dashboard for you to create, view, and manage your applications, devices and services. The Bluemix dashboard also provides the ability to manage organizations, spaces, and user access.
We did find that the “dashboard” paradigm in the Bluemix system somewhat of a misnomer and a bit confusing. Instead of having one dashboard, you have dashboards for every service that you attach. It’s easy to get lost in the sequence. But with some perseverance we got through the learning curve.
Bluemix provides access to a wide variety of services that can be incorporated into an application both delivered from IBM and third party vendors.
Displaying Real Time Data on the IBM Bluemix IOT Platform from an ESP8266
In order to get a display going in the Bluemix platform, we need to “wire” our device to the IoT Real-Time Insights service on Bluemix.
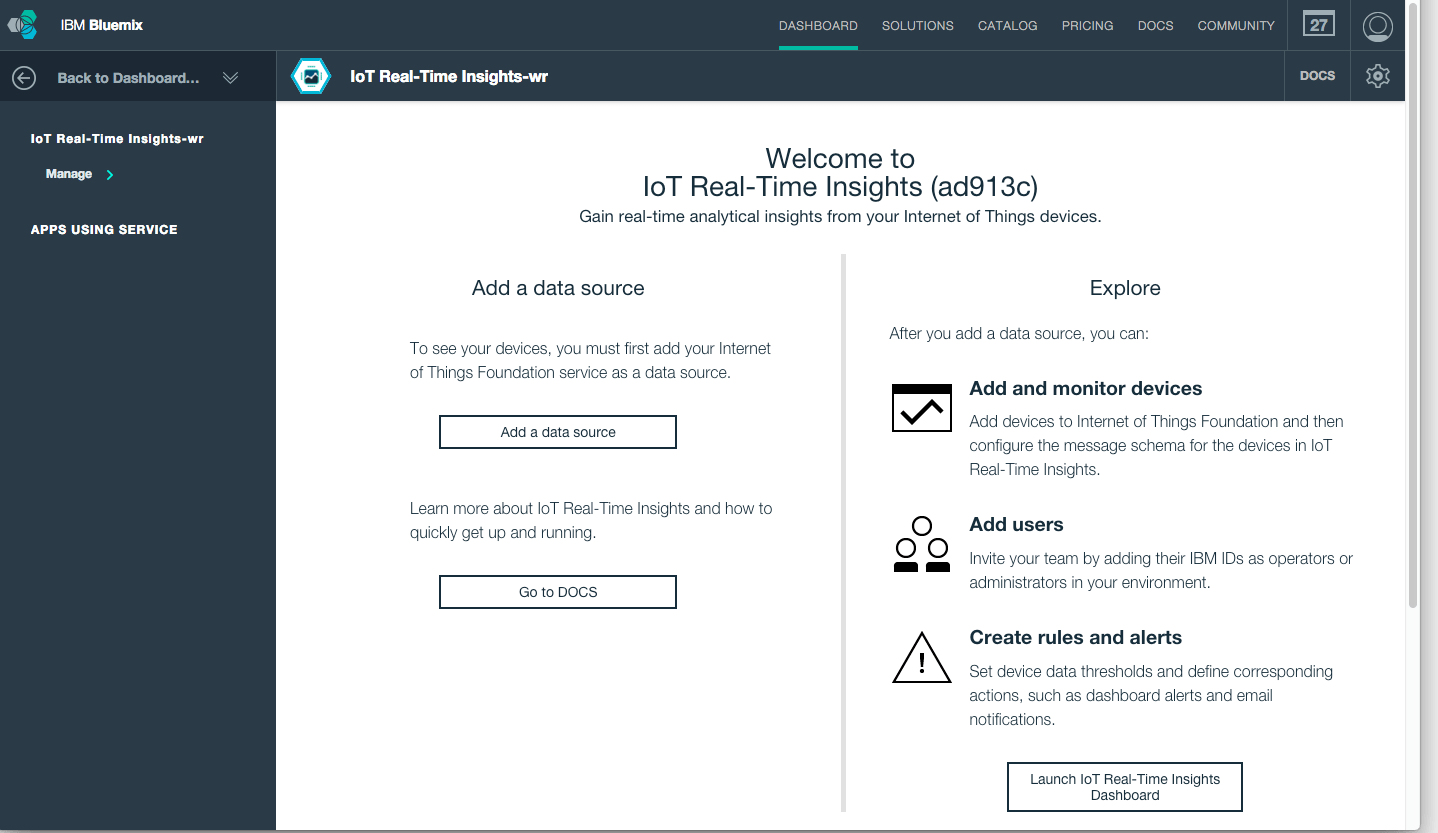
Step one is to add the IoT Real-Time Insights service to your Bluemix dashboard. Open the Bluemix dashboard (the first dashboard after login) and click “USE SERVICES OR APIS” and add the IoT Real-time Insights as a service. It is way down at the bottom of the page. You will then have this screen:

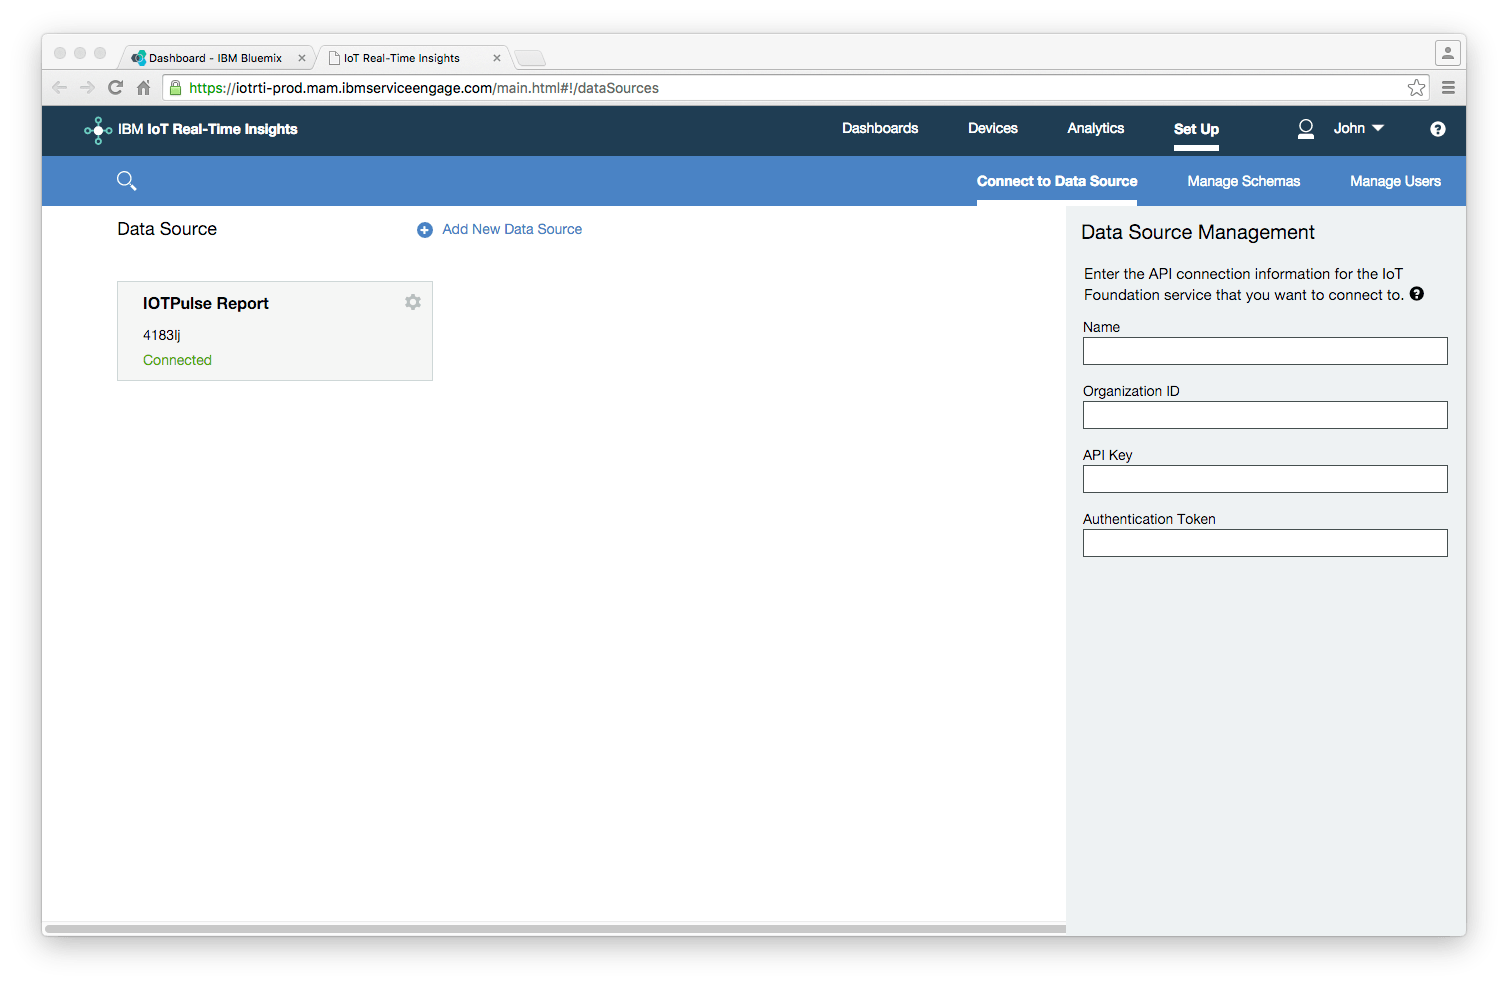
Step two is to connect our device to the IoT Real-Time Insights Page by first generating an API key and then generating a data source.
Click on the IoT Real-Time Insights block on the above screen.
API Keys
Next, we have to generate the API keys for using the Data Source
- You must now create API keys to connect the two services (IoT Foundation and IoT Real-Time Display)
- From the Bluemix dashboard, click the Internet of Things tile.
- Click Launch dashboard to open the Internet of Things Foundation dashboard.
- Navigate to Access > API Keys.
- Click Generate API Key.
- Make a note of the API Key, Authentication Token, and the Organization ID that is displayed at the top of the IoT Foundation dashboard.You use this information in IoT Real-Time Insights to connect the services. These keys will remain displayed in the datasource.
Adding the Data Source
- Go to Devices > Manage Schemas and click Add new message schema.
- Enter a name for the message schema, for example:
New message schema. - Click Link new data source and select the data source and device type that corresponds to your IoT Foundation instance and device. event types for your device is here.
- Add one or more data points that you want to include in the device dashboards (sampleCount and lightValue in our example).
The available data points are defined in the JSON payload of the messages that are sent by a device. - Click Select from connected device.
- In the Add data points dialog, select one or more data points to add, and then click OK.
- The selected data points are added with the description set to the name of the data point.
- Then click the green arrow (on the left side of the screen) to save the information and create the data source.
Adding the Dashboard to the IoT Real-Time Display
Now we add the displays. From the screen below, click on Launch IoT Real-Time Insights Dashboard in the lower right hand column.
Click on dashboard and then browse dashboards. Add a new dashboard. Then do the following:
- Add new component
- Select chart
- Add line to the chart
- Select your device and then select lightValue as the parameter
- Click on the green arrow.

If your ESP8266 is running and sending data up to the IBM Bluemix IOT, then you will see the values start to populate the graph.

Conclusion
This concludes our IoT ESP8266 tutorial. If you have followed this all the way through, then you now have your own IoT device connected up to the cloud based IBM Bluemix IoT environment. There are many more things you can do with this environment such as putting data in databases, setting alarms and actions based on your device and even have Bluemix tell your devices what to do. We will be exploring some of these functions in the coming months at SwitchDoc Labs.
7 Trackbacks / Pingbacks
Comments are closed.