
IOT ESP8266 Tutorial – Using the Arduino IDE

This is the third of a multi-part posting on the ESP8266. In this posting we are showing how to use the Arduino IDE with the ESP8266. The board to the left is a new SwitchDoc Labs project for pulse rate measuring for an upcoming IOT Project Cookbook.
Part 1 IOT ESP8266 Tutorial – Using nodeMCU/LUA
Part 2 IOT ESP8266 Timer Tutorial – Arduino IDE
Part 3 IOT ESP8266 Tutorial – Using the Arduino IDE
Part 4 IOT ESP8266 Tutorial – AT Command Set Firmware
Part 5 IOT ESP8266 Tutorial – Connect to the IBM Bluemix Internet of Things
Part 6 IOT ESP8266 Tutorial – Sending ESP8266 Data to the IBM Bluemix IOT
Part 7 IOT ESP8266 Tutorial – The IOT Application and Source Code
Part 8 IOT ESP8266 Tutorial – Displaying the data on the IBM Bluemix IOT
We are using the Adafruit ESP8266 Huzzah breakout board for these postings.
The ESP8266
The ESP8266 is made by a privately held company in China called Espressif. They are a fabless semiconductor company that just came out of nowhere and shook up the whole industry. Now all the major players are working on inexpensive versions of an IOT chip with WiFi connectivity. And they are all struggling to make it as inexpensive as the ESP8266

The Adafruit ESP8266 Huzzah
The Adafruit ESP8266 Huzzah board is a great breakout for the ESP8266. It makes it much easier to use with the Raspberry Pi than the really cheap modules.
Most of the low cost modules are not breadboard friendly, don’t have an onboard 3.3V regulator or level shifting for signals. The Huzzah has all of those features. For more on the ESP8266 Huzzah board see this posting.
The Arduino IDE
The Arduino IDE is a well used, proven path to compile code for small computers using C/C++. There are hundreds of libraries for all sorts of purposes.
The adding of Arduino IDE compatibility has dramatically expanded the possibilities for using the ESP8266 in IOT applications, small applications that you want web and Internet connectivity. You can buy an ESP8266 for $3.00 which is roughly 1/5 the price of an Arduino Mega.
The ESP8266 doesn’t have nearly the I/O capability of the Arduino family of boards, but hey, you can buy 5 of them for the same price. We believe that the ESP8266 is leading us to a whole new set of inexpensive, highly usable processors and IOT platforms. When you use the ESP8266 under the Arduino IDE, you can treat it just like a microcomputer + WiFi board, with no other processors needed.
Installation of the IDE
With the new 1.6.x release of the Arduino IDE, it is much simpler to add and manage new boards. In the case of the Adafruit Huzzah ESP8266, it a simple process. Rather than repeat the tutorial here, we would suggest following the Adafruit tutorial.
There are numerous other guides for using the Arduino IDE such as this one from SparkFun.
Use Version 1.6.5 of the Arduino IDE for better results.
Webserver Code
Here is the Arduino version of the simple webserver. 71 lines of code. Not bad. This web server code is included with the Arduino IDE under File->Examples->ESP8266WebServer.
#include
#include
#include
#include

const char* ssid = "........";
const char* password = "........";
MDNSResponder mdns;

ESP8266WebServer server(80);

const int led = 13;

void handleRoot() {
  digitalWrite(led, 1);
  server.send(200, "text/plain", "hello from esp8266!");
  digitalWrite(led, 0);
}

void handleNotFound(){
  digitalWrite(led, 1);
  String message = "File Not Found\n\n";
  message += "URI: ";
  message += server.uri();
  message += "\nMethod: ";
  message += (server.method() == HTTP_GET)?"GET":"POST";
  message += "\nArguments: ";
  message += server.args();
  message += "\n";
  for (uint8_t i=0; i<server.args(); i++){
    message += " " + server.argName(i) + ": " + server.arg(i) + "\n";
  }
  server.send(404, "text/plain", message);
  digitalWrite(led, 0);
}

void setup(void){
  pinMode(led, OUTPUT);
  digitalWrite(led, 0);
  Serial.begin(115200);
  Serial.println("ESP8266 Webserver Start");
  WiFi.begin(ssid, password);
  Serial.println("");

  // Wait for connection
  while (WiFi.status() != WL_CONNECTED) {
    delay(500);
    Serial.print(".");
  }
  Serial.println("");
  Serial.print("Connected to ");
  Serial.println(ssid);
  Serial.print("IP address: ");
  Serial.println(WiFi.localIP());

  if (mdns.begin("esp8266", WiFi.localIP())) {
    Serial.println("MDNS responder started");
  }

  server.on("/", handleRoot);

  server.on("/inline", [](){
    server.send(200, "text/plain", "this works as well");
  });

  server.onNotFound(handleNotFound);

  server.begin();
  Serial.println("HTTP server started");
}

void loop(void){
  server.handleClient();
}
We added the SSID and the password of our local WiFi network. Then we compiled it, loaded into the ESP8266 and it worked. That simple.
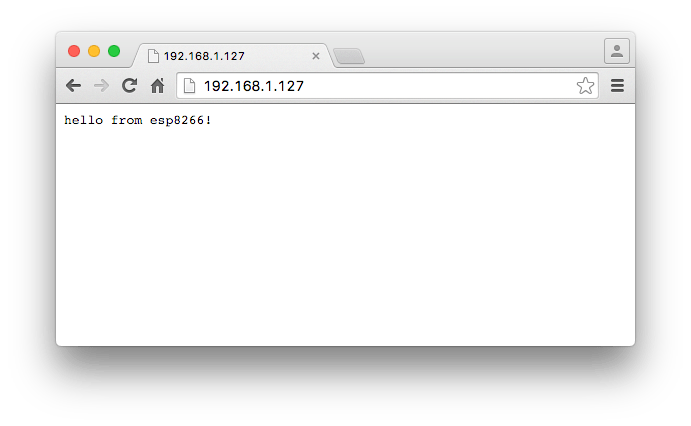
ESP8266 Webserver Start
............
Connected to xxxxxx
IP address: 192.168.1.127
MDNS responder started
HTTP server started
And the resulting Chrome browser screen is shown to the right.
Comments on Firmware
We will admit it. The Arduino IDE is our favorite way to program the ESP8266 at the writing of this column. It’s a familiar environment and it works.
The ESP8266 is behaving very well in this environment. We have over 5 of the ESP8266 units running in LightSwarm all compiled under the ESP8266 Arduino IDE and libraries.
There is one important thing to remember about using the Arduino IDE and libraries for this chip. The Arduino has traditionally been single threaded and the ESP8266 by it’s very nature has to be multi-threaded in order to receive and transmit on the WiFi while you are doing something else. In order to make all this work reliably, you need to insert delay(0) statement in various places in your code, especially in computationally expensive pieces. A delay(0) statement gives the ESP8266 a chance to do some of it’s background processing and keeps the data flowing. The ESP8266 library also provides a function yield() to do the same thing.
PlatformIO
We were looking to see if we can set it up to work under platformio and we were very pleased to already see support for the ESP8266.
Platformio is a cross-platform code builder and the missing library manager for a whole bunch of different IDE systems (Arduino, Eclipse, etc.). We use it on SunRover because we want to program the Arduino in the box from the Raspberry Pi (also in the Robot) without needing to put a whole graphical display up. This allows us to program both computers remotely, which is an important feature. In Project Curacao, we can not reprogram the Arduino Battery Watchdog, which for the past two years has been an on-going irritation.
Once we installed platformio, we can just use the command line. Don’t know how to use the command line on the Raspberry Pi? An upcoming SwitchDoc Labs posting will take you through all the basics. Be prepared to become a master wizard with your new knowledge after reading that post!
10 Trackbacks / Pingbacks
Comments are closed.